Showing posts with label CCI Ammunition. Show all posts

Saturday, April 15, 2017

Aguila and CCI - Standard Velocity Shootout


I've long considered switching from 22LR high velocity ammunition to standard velocity match ammunition for speed steel competition.  While most wouldn't consider the recoil of 22LR ammunition as a detriment to fast shooting, I've done enough side by side comparison testing to know I can "feel" the difference between standard and high velocity ammunition.  With competitions won and lost by tenths of seconds, anything that allows me to get back on target faster is something I'm interested in exploring.

If you are new to the world of 22LR ammunition, here's a ballpark overview of the 22LR velocity continuum.  It's not exact, and you will notice that the ammunition types may overlap at the ends of their velocity range.  Let's just call this my interpretation of 22LR ammunition I've seen available recently with a little bit of 22LR SAAMI specification review thrown in for good measure.
     Subsonic  usually less than 1080 fps
     Standard Velocity between 1050 fps and 1125 fps  
     High Velocity  between 1150 fps and 1300 fps
     Hyper Velocity over 1300 fps

As 22LR ammunition supply has started to catch up with demand, two of the more widely available standard velocity loads are produced by Aguila and CCI.  CCI Standard Velocity is a favorite of many shooters and has been for many years. Aguila Super Extra is comparatively new to me.  I honestly can't remember ever seeing the Aguila ammunition brand until about 5 or 6 years ago. Earlier this month I purchased a brick of each and decided to do a little testing to see if either brand performed noticeably better than the other when tested in firearms similar to those I use for speed steel competition.


At this point, I feel compelled to state the obvious.  These tests were funded entirely by me. The tests were conducted as stringently as possible to control variables that were under my control.  The test results are representative of the performance differences I noted when testing TWO SPECIFIC SAMPLES of ammunition purchased at retail level. The results are not intended to be interpreted as representative of their respective brands, or even other samples of these specific ammunition products.  I have no vested interest in the outcome of the tests other than my own knowledge and satisfying my curiosity.


My test firearms were previously used by me in speed steel competitions.  High power scopes were added to facilitate more precise shooting.  Both scopes were dialed up to 16x magnification for the tests.  Rifle barrel length 16.5".  Pistol barrel length 4.5".  All shooting was done from the rests shown in the photo above.


Targets were set at 25 yards.  A chronograph was positioned 10 feet in front of the muzzle to capture the velocity of each test shot.

The velocity data summary and test targets are all displayed below.  Three rifle test groups were shot on the bottom targets and a single pistol group was shot on the top target of each page.  The groups are labeled for your convenience.


It might be tempting to rush to judgement based on this comparison test, but we also need to consider functionally reliability.  I actually worked on this project over two days. On day one, I sighted in the scopes.  I quickly discovered the trigger installed in my rifle was giving me light strike failures to fire with both ammunition types.  More frequently with the Aguila than the CCI.  I recovered a few of those rounds and included a picture below.


I swapped out the trigger with another I had on hand before returning to the range to conduct the actual testing.  Replacing the trigger resolved the light strike "problem" with both ammunition samples.  Clearly, this wasn't really a problem with the ammunition, but rather my test firearms.  It does illustrate the importance of testing ammunition in YOUR specific firearms before you rely on it for competition.

Similarly, your personal pistol and rifle barrels may give you better, or worse, groups than I managed in my testing.  My take away from this testing was confirmation that Aguila Super Extra SV groups really well from Tactical Solutions X-Ring rifle barrels.  This is something I initially discovered during my accuracy testing with the Ultimate Lightweight Small Game Rifle.


I'm currently working my way through my last few cases of Federal Champion AutoMatch.  Before that supply is gone, I'm going to do some additional testing with Aguila Super Extra SV in my current competition firearms to make sure it's 100% reliable. If it is, I anticipate making the change to use Super Extra SV as my practice and competition ammunition.

Friday, February 24, 2017

Ultimate Lightweight Small Game Rifle


The idea of building the Ultimate Lightweight Small Game Rifle (ULSGR) was hatched last year as I worked through the process of building two race rifles for NSSF Rimfire Challenge and Steel Challenge competitions. After a few false starts, and money down the drain, I landed on a combination of parts that proved to be very light in weight, but still delivered the functionally reliability required for serious timed competitions.

Purpose built for small game hunting at ranges of 25 yards or less, I wanted to build the lightest possible rifle that would function reliably with a variety of ammunition ranging from subsonic to supersonic velocities.  Avoiding the additional weight of add-on optical sights, the rifle would be fitted with windage and elevation adjustable open sights.  It would be built from "match grade" components, and be capable of shooting sub 1 inch 10 shot groups from a bench at 25 yards with ammunition it preferred.

I knew I could complete the ULSGR rifle with a total weight of less than 4 pounds, including a sling and magazine, if I followed the basic recipe I developed for my race rifles.  I set my stretch goal at 3.75 pounds and set about ordering new parts and re-purposing existing parts that I had accumulated during previous builds.  With specific colors in mind, it took several months to get everything I had in mind in all the right colors I wanted.

Completed rifles weighs 3 pounds 10 ounces

Parts List:

After a few false starts on previous builds, caused by not having all the required parts to complete a rifle, I've gotten much better at ordering all the required parts.  If you follow this parts list closely, you should have everything you need to build a complete rifle.

Trigger Assembly - Ruger BX Trigger
Stock - Knoxx Blackhawk! Axiom Coyote Tan
Receiver - Tactical Innovations Elite22F Flattop Matte Black (requires FFL transfer)
Barrel - Tactical Solutions 10/22 Open Sight Threaded Barrel Matte OD Green
V-Block - Tactical Solutions Performance
V-Block Cap Screws (2) - Tactical Innovations Blue
Bolt - Tandemkross "Krossfire"
Bolt Handle - Tactical Innovations Skeletonized
Recoil Buffer - Tandemkross "Shock Block"
Receiver Cross Pins (2) - Tactical Innovations Stainless
Takedown Cap Screw - Tactical Innovations Stainless
Sling - Ten Point Gear Tan/Green Camo
Magazine - Ruger BX Clear

If you went parts shopping today, it would cost around $750 plus shipping and transfer fee to pick up everything on the list.  Watching for sales and free shipping offers might knock a few dollars off the total.  It's not a cheap build, but I can't think of a single thing I would change about the rifle.  There isn't any room for functional or weight reduction improvement.  Also of note, the barrel is threaded just in case the process of purchasing a noise suppressing muzzle attached device is simplified in the future.   

Question Everything:

In my quest to reduce weight, I did comparison testing with several different rifle components after they arrived.  This was more for my own knowledge than anything else.

The first was the receiver.  The Tactical Innovations machined aluminum receiver was nearly an ounce lighter than a standard Ruger 10/22 cast aluminum receiver.  It was also much smoother inside and features a hole in the rear of the receiver where a cleaning rod can be inserted for breech to muzzle cleaning if you wish to do that.


I really like the Volquartsen TG2000 trigger group.  I've been using them for years in several different rifles.  I initially planned to use green one pictured for this rifle.  Before making my final decision, I compared the weights of the Ruger BX trigger and TG2000. Since this will strictly be a hunting rifle, I opted to go with the BX trigger and shave about 2.5 ounces off the build weight.  

The last comparison I wanted to share was the weight difference between the clear and black Ruger BX magazines.  I've always suspected the clear magazines weighed less than the black magazines. They "feel" lighter when you handle them.  Taking two brand new magazines out of the factory packaging, it was neat to see my suspicions were correct.  The clear magazines are 10% lighter than the black magazines.


Assembly:

The most difficult part of assembling the rifle is fitting the barrel.  If you came to the blog to read about the rifle then you are seriously interested in learning more about it, or possibly considering building your own rifle one day.  This video is for you.
 

The rest of the assembly process was very easy.  No additional fitting of parts was required.  A small drop of blue Loctite was required to keep the thread protector from loosening during firing.

On The Range:

As I anticipated, the rifle proved to be a flawless performer on the range.  It chewed through mounds of subsonic, standard, and high velocity ammunition with equal gusto. After two trips to the range, and several hundred rounds of mixed ammunition, I experienced my first failures to eject spent cases with standard velocity ammunition. After a good cleaning, it performed flawlessly again on the next trip to the range.
The 2 pound 10 ounce pull weight of the Ruger BX trigger and fully adjustable open sights both contributed greatly to accurate off-hand shooting at targets out to 50 yards.  The rifle is a plinker's dream come true and several hours of trigger therapy were undertaken in pursuit of this review.  As documented in the video, I had a great time "hunting" my steel critter targets and can't wait to get this rifle out in the woods next Fall.  

Velocity and accuracy testing was done on a portable bench using Caldwell's new Stinger rifle rest.  10 shot velocity averages were captured at 10 feet with a target placed at 25 yards.  The rifle clearly had preferences for some specific ammunition brands and loads over others.  The best groups came from both standard velocity lead round nose and high velocity hollow points.  All of the ammunition used for testing was of good quality, and represented ammunition most commonly used for small game hunting.

My only disappointment, from the range time spent with the rifle, was that I didn't find a good subsonic ammunition choice for the rifle.  I've got others available for testing, but it would have been great if one of the three varieties tested performed as well as the high velocity Mini-Mags.


Finishing Touches:

My initial thought was to use a basic 1" wide nylon web sling for the rifle.  As I was shopping for that sling, I happened to see these paracord wrapped slings.  Available in several different color patterns, this one caught my eye and I made the purchase even though it was contrary to my overall goal of minimizing weight.  I thought it just looked perfect for the rifle so a compromise was made.  It looks great and is perfectly functional even if it does add a couple extra ounces to the final rifle weight.


After my discovery that clear BX magazines weigh less than black BX magazines, I opted to use a clear magazine with the rifle.  I'm not really sure where I initially saw the reference, but I discovered that clear BX magazines can be dyed with common RIT dye.  Using a bottle of Rit DyeMore Sandstone, I ended up with two clear magazines with a rootbeer tint.  More fitting for a hunting rifle.  It doesn't make the magazines special in any way other than I can tell at a glance they belong with the ULSGR.  It was also a fun add-on project with the rifle build.


I'm very pleased with my finished rifle (as if you couldn't tell by now).  I hope the closing photo gives you some perspective on how light the rifle really is.  The partially filled half gallon water jug weighs exactly the same as the rifle.  Sling the rifle over your shoulder and you can easily forget you have it with you as you cross hill and dale in pursuit of small game.  I could have built it cheaper, but I really don't think I could have built it better.  It's a rifle I'm proud of and will enjoy for many years to come.

Total rifle weight is the same as the partially filled water jug.

Tuesday, November 24, 2015

Competition Shooter Profile - Aimee Williams

Photo by Jake Wyman
Name:  Aimee Williams
Home State:  Idaho
Years Shooting:  4
Years Competing:  3
Competition Types:  Rimfire Challenge, Steel Challenge, USPSA

Notable Awards and Competition Placements:
• 2013 10th place Lady’s Division - Ruger Rimfire Challenge, Parma Rod and Gun Club, Parma, Idaho. Competitors 136.
• 2014 1st place Lady’s Open Division, 2nd place Overall - Shoot for a Cure, (proceeds go to breast cancer screening for underinsured and uninsured women), Nampa Rod and Gun Club, Nampa, Idaho. Competitors 168.
• 2014 4th place Lady’s Open Division, 35th Overall - Idaho NSSF Rimfire Challenge, Parma Rod and Gun Club, Parma, Idaho. Competitors 136.
• 2015 1st place Lady’s Division, 28th Overall – NSSF Rimfire Challenge Northwest Championship, Parma Rod and Gun Club, Parma, Idaho. Competitors 168.
• 2015 1st place Lady’s Rifle Open Division – Season Points Race Idaho Steel Challenge, Nampa Rod and Gun Club, Nampa, Idaho. Competitors 386.
• 2015 1st place Lady’s Pistol Open Division – Season Points Race Idaho Steel Challenge, Nampa Rod and Gun Club, Nampa, Idaho. Competitors 386.
• 2015 4th place Lady’s Open Division, 48th Overall – NSSF Rimfire Challenge World Championship, Old Fort Gun Club, Ft. Smith, Arkansas. Competitors 202.

Photo by Ron Stricklin
NSSF Rimfire Challenge Class Preference:  Open
Gear Rundown:
Pistol – Ruger 22/45 Lite Frame with a Tactical Solutions Pac-Lite 4.5” Threaded Barrel
Allchin Pac-Lite Compensator
Tactical Solutions Pac-Lite Ruger Intergal Scope Base
Tandemkross “Eagle’s Talon” Extractor
Tandemkross Extended Magazine Release
Tandemkross “Firer Starter” Titanium Firing Pin
Tandemkross “Kanewolf” Sling Shot Part Kit
Tandemkross Magazine Disconnect Bushing
Volquartsen  Accurizing Kit
Vortex Optics Red Dot 6MOA

Photo by Ron Stricklin
Rifle – Tactical Solutions X-Ring with Vantage RS Stock
Allchin 22 Rim-Fire Rifle Compensator
Vortex Optics Red Dot 6MOA

Ammunition Preference: CCI Standard Velocity

Sponsors:
Tactical Solutions, Vortex Optics, Tandemkross, Larry’s Sporting Goods, and Allchin Gun Parts

Photo by Oleg Volk
Please describe yourself in 200 words or less.
I grew up in Oregon, Colorado, and Idaho where I have resided since 1982.  My grandparents had a 40 acre farm in Nampa where I spent much of my time.  I grew up an only child and believed that whatever I took on I would give it my all and strive to be the best I could be. I studied at BSU where I earned my BBA in CIS.  I got married and had twin boys, who have grown into amazing young adults.  Working full time at a local hospital and raising twins as a single mother didn't allow much, if any free time.  I'm not complaining, I loved participating at my boys' school and attending their school functions as well as hanging out with them and planning varied experiences with them.  I believe in giving anything I do my all and strive to become the best I can be.

Do you enjoy any other hobbies?
I love spending time with my kids and their friends. I love spending time with my friends and my dog. I enjoy taking photos and traveling.

How did you get started competing in Rimfire Challenge?
It wasn't until I got married and my then husband took me out to do a little bit of target shooting and took me on a few hunting trips.  I still didn't really feel compelled to do more shooting and certainly not on my own.  Time went on and I became a single mother of twin boys who, without consent, became independent young teenagers.  Their father took them shooting and hunting and my boys really wanted to share their enjoyment of shooting with me.  In 2012 my boys took me shooting for Mother's Day!  They were very excited and hopeful I would love shooting.  I was more concerned with being safe and felt a little unsure as they lead me through target shooting.  That was the beginning.  I found a local indoor gun range and set up time for myself to learn to be safe and decided I loved shooting.

In the spring of 2013, I started competing at local Steel Challenge Matches.  I shot my first year of Steel Challenge with that pistol and still have it as the serial numbers coordinate with my son’s birthdate.  That fall I wanted to shoot in the Ruger Rimfire Challenge in Parma, Idaho.  Since I only owed a pistol, the same indoor gun range built a 10/22 rifle for me to compete in that match.  After shooting the Rimfire Challenge I was hooked and wanted to learn how to shoot a rifle.

Photo by Nelson Dymond
Any advice you would like to give to new competitors just starting out with Rimfire Challenge?
Make sure that your rifle stock fits you properly and that you have good equipment. Make sure that your guns like the ammo that you purchase. Decide if you want to shoot Open or Limited and buy equipment accordingly. Ask a lot of question. Have Fun.

How do you practice and prepare for competitions?
Practice every week and sometime several times a week; decide what you are going to practice before you get to the range.

What do you enjoy most about NSSF Rimfire Challenge competition?
I am able to shoot two guns, the camaraderie, the feeling that I have a “shooting family”.

Is there anyone you would like to thank or recognize?
I would like to thank my boys for believing in me and encouraging me to follow my dreams and having confidence in my abilities.  Justin especially encouraged me from the beginning even before I knew I even had any talent shooting.  My dear friend Cindy has been a constant support during my indoor practice sessions.  My fiancĂ© Jim’s support means the world to me.  His knowledge of guns and assistance in getting my equipment and being by my side as my gunsmith is incredible.  Mike for helping me get one of my first sponsorships.  I would especially like to thank Ron Stricklin, who is not only my mentor and coach; he has become a dear friend.  Everyone that is supportive of me and believes in me.

I would also like to thank my sponsors: Tactical Solutions, Chet Alvord; Tandemkross, Bryan Haaker and Jake Wyman; Vortex Optics; Larry’s Sporting Goods; Allchin Gun Parts, John Allchin.

If you would like to know more about Aimee and follow her competition updates, you can find her Facebook Page at Aimee Williams – Competitive Shooter

Thursday, November 19, 2015

22 WMR Tests | CCI Maxi-Mag and Maxi-Mag +V


If you are new to 22 WMR, I'll try to eliminate some potential confusion that I experienced when I expanded my rimfire horizons beyond 22 Long Rifle.  The 22 WMR name is ammo shorthand for .22 Winchester Magnum Rimfire.  You may also see the same cartridge called 22 Mag, 22 Magnum, 22 Win Mag, or some other variation that doesn't pop into my head right at this moment.  Regardless of the name, the 22 WMR is a wicked rimfire round that delivers exceptional terminal performance for hunting small game and varmints at ranges to 100 yards and beyond.

The CCI catalog lists six 22 WMR loads classified as varmint loads.  The main difference between a varmint and small game load is what happens to the bullet when it strikes the intended target.  Varmint bullets are designed to expand violently, fragment, and dump their kinetic energy into the target as quickly as possible.  Sometimes with explosive results.  Small game bullets are designed for limited expansion to minimize damage to the meat of the game animal, while penetrating deeply for a humane harvest.

It is possible to use varmint loads for small game hunting, just as it's physically possible to hunt ducks with a 30-30, but you may not like the condition of your quarry when you retrieve it.  You will be much better off using a small game load on a varmint, than using a varmint load on small game.  CCI simplifies the ammunition selection process a bit by classifying the Maxi-Max as suitable for varmint and small game.    

These two CCI 22 WMR loads are, in my opinion, those you will most likely find available if you buy your ammunition at a large national retail chain.  For this reason, I thought it best to start my 22 WMR testing with these loads.  Initially, I planned to report on each load individually.  After running the tests, I changed my mind because these two loads perfectly illustrated the terminal performance differences between small game and varmint loads.  

Test Protocol
5 test shots for accuracy and velocity.  Measured at 40 yards.

Multiple test shots into a block of Clear Ballistics gel placed 40 yards down range. Test shot velocity is measured at the gel block.

Recovered bullets are weighed and measured with averages recorded in the data sheet below.

Test Videos
Direct Link to Video on YouTube

Direct Link to Video on YouTube

Data Sheet

Click on Data Sheet for a larger image
40 yard accuracy was a bit over half an inch for both loads. 
Test Recap
Velocity - both loads ran slightly faster than the specification from CCI.  Our velocity measured at 40 yards was almost as fast as the 25 yard velocity published by CCI.
Maxi-Mag average velocity 1643 fps
Maxi-Mag +V average velocity 1962 fps

Accuracy - both loads were reasonably accurate in the test rifle.  While a full 50 yard test would have been better, the range was too muddy beyond the 40 yard line on test day. With the rifle zeroed for the Maxi-Mag, it was interesting to see the point of impact change by 3/4 of an inch with the lighter Maxi-Mag +V.
Maxi-Mag 5 shot group size .608"
Maxi-Mag +V 5 shot group size .629"  

Retained Weight - The Maxi-Mag +V travels faster because it is 10 grains lighter than the Maxi-Mag. Both bullets demonstrated significant fragmentation, which is to be expected with a varmint bullet. As you look at the recovered bullets the Maxi-Mags are perfectly formed mushrooms and the Maxi-Mag +V bullets have completely turned themselves inside out.
Maxi-Mag average retained weight 31.6 grains  79% weight retention.
Maxi-Mag +V average retained weight 18.7 grains  62% weight retention.

Penetration - If there was a surprise hidden in this test, it was the large variation in penetration between the two loads.  The average penetration of the Maxi-Mag was more than double that of the Maxi-Mag +V.  On the surface it would be easy to explain away the difference by looking at the expanded diameter differences between the two loads, but that's only part of the reason.  The sectional density differences between the two bullets also played a part in the penetration variation.  If you want to get your ballistics geek on, here's a great primer on sectional density from Chuck Hawks.  Substitute Gel Block for Game Animals, and you will see that the article applies quite well to this test.
Maxi-Mag average penetration 15.3 inches.
Maxi-Mag +V average penetration 6.89 inches.

Expansion - The Maxi-Mag +V bullets didn't just expand.  They blew up and turned themselves inside out.  The recovered bullets are flat discs of lead clinging to a sheet of copper bullet jacket.  The Maxi-Mag bullets have a traditional bullet profile with a bullet shank capped by a flattened and expanded nose.
Maxi-Mag average expansion .328 inches.
Maxi-Mag +V average expansion .396 inches.

In a perfect world, both of these loads would be readily available and you could keep a supply of each on hand for whatever type of hunting you were planning on doing.  If I had to pick one load, due to current ammunition availability issues, I would be totally satisfied with the Maxi-Mag for small game hunting and varmint hunting/control.  In this test it was slightly more accurate, expanded well, and penetrated to a sufficient depth for small game hunting.


Sunday, October 18, 2015

22 LR Ammo Test - CCI Velocitor 40 Grain CP HP


CCI Velocitor is the fastest of the five 22 LR loads classified as Small Game ammunition.  The heavy 40 grain hollow point bullet is driven to 1435 feet per second velocity, which puts it between the high velocity and hyper velocity CCI loads.  The Velocitor features a unique copper plated hollow point bullet that was derived from Gold Dot bullet technology even though it looks nothing like the 40 grain Gold Dot bullet loaded in the Speer Gold Dot Short Barrel 22 WMR load.  I've never shot this particular load before, so I was very interested to see how it performed.

Following the previously established test
protocol, I used a Ruger 10/22 as the test rifle and all shots were taken at a range of 25 yards.

I had a little problem with the chronograph catching the velocity of all test shots due to the angle of the sun.  I ended up taking ten test shots to capture baseline velocity and all shots settled into a group of just less than .7 inches.  I usually only shoot five shots for the group.  This load appears to be sufficiently accurate for small game hunting.

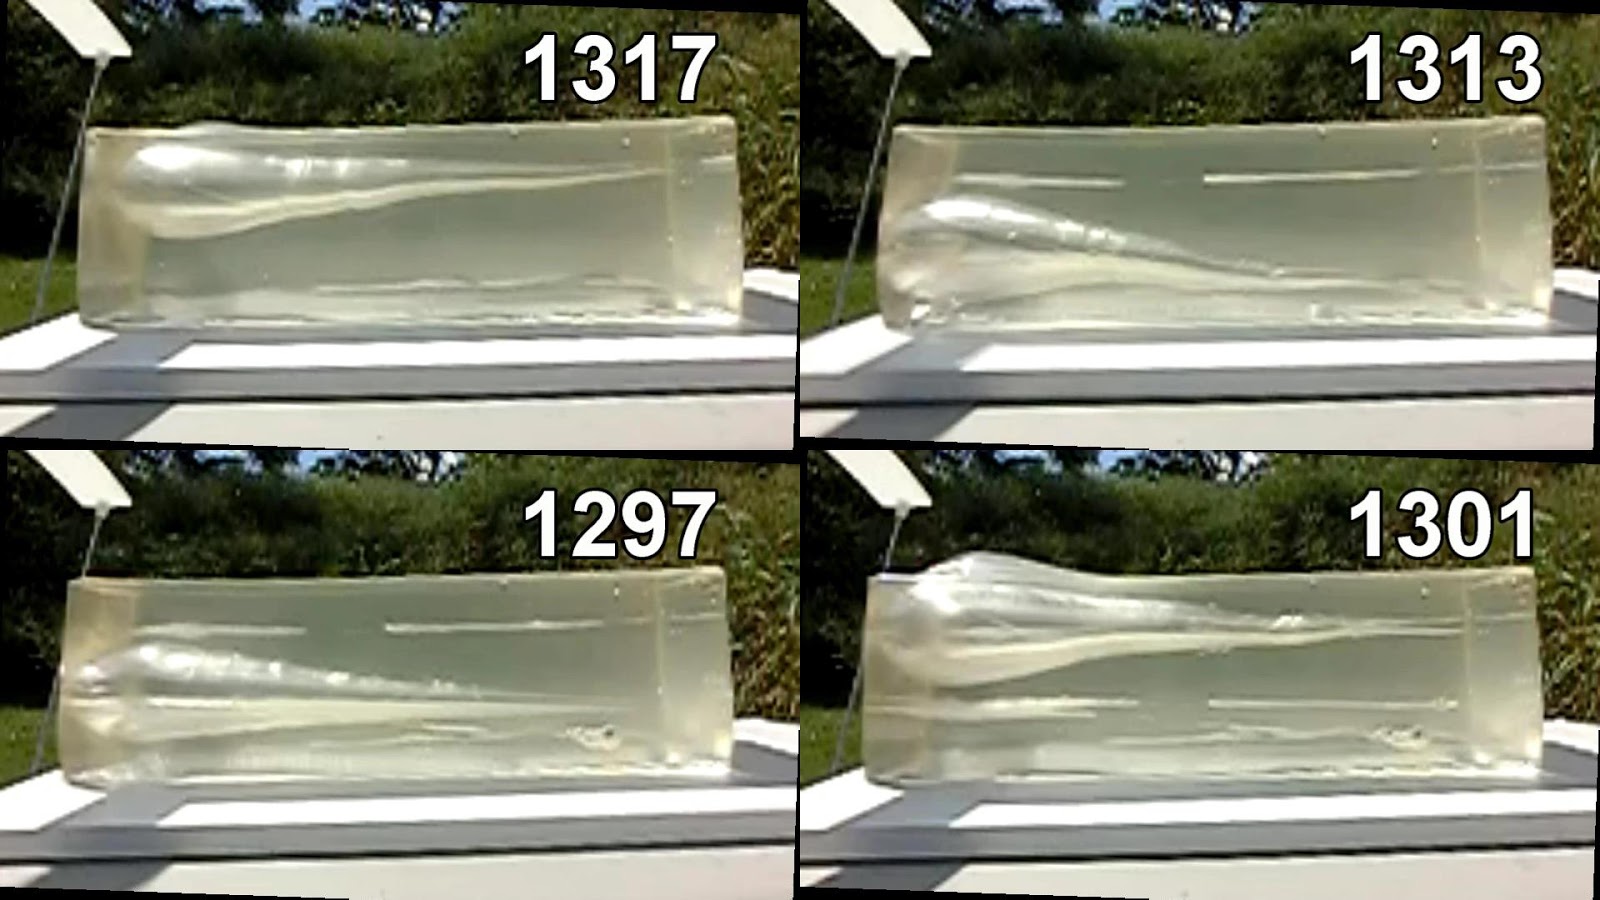
After swapping the Clear Ballistics gel block for the target, I ran four test shots into the 6"x6"x16" clear gel.  The high-speed camera captured four very impressive temporary expansion cavities.  Even though two of our four test shots exited the gel block and were not recovered, it certainly appears that all four expanded uniformly across a narrow band of velocities between 1297 and 1317 feet per second.

My Thoughts on this Test
High velocity with controlled expansion and deep penetration are all great things to find in a small game hunting load.  The accuracy of this load in my 10/22 was also "good enough" for the intended purpose.  It may not deliver tack driving accuracy, but it will most assuredly ruin a rabbit or squirrel's day.

Final Verdict
Brick-Worthy  This is certainly a small game hunting load to buy by the brick.  It delivers exceptional down range energy and uniform expansion.  A video recap of the test is included below.
 
Direct Link To Video On YouTube